Matt's 1970 'Trans-Am' Cuda

Use this forum for all your builds in progress.

Moderator: Moderators

User avatar
Matt
Posts: 1024
Joined: Sun Apr 18, 04 10:57 pm
Location: Matt Snowball, Tongham Surrey

Re: Matt's 1970 'Trans-Am' Cuda

Post by Matt »

Soooo...

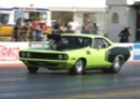
The last part of the bodywork - the rear quarters. Been putting this off for a while, as I'll need to flare the quarters after fitting to give adequate tyre clearance, and to match the look of the factory race cars - and this had required quite a lot of chin-scratching.

There's not a lot of width clearance in the E-body wheelwells (as most drag racers know) Also the inner arch tapers in considerably above the lip, so the more you lower the suspension the less clearance you get.

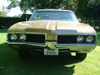
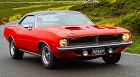
Looking pictures of the factory cars, the entire quarter (right from the top edge) appears to bulge out in the rear wheel areas (and within this, there's variation in flare and arch shape depending on which car it was, and when the pic was taken)
_AYS6381.jpg
_AYS6381.jpg (21.23 KiB) Viewed 1411 times
_SMA8443.jpg
_SMA8443.jpg (63.48 KiB) Viewed 1411 times
_SNM2592 (1).jpg
_SNM2592 (1).jpg (69.69 KiB) Viewed 1411 times
1970-plymouth-cuda-trans-am-racer-swede-savage-48.jpg
1970-plymouth-cuda-trans-am-racer-swede-savage-48.jpg (64.32 KiB) Viewed 1411 times
wc051555x.jpg
wc051555x.jpg (62.38 KiB) Viewed 1411 times

To get started, cut away most of the outer quarter, and all the parts of the inner one that stick down too far. Dolly the inner one back into some sort of circular shape
IMG_3252.jpg
IMG_3252.jpg (83.97 KiB) Viewed 1411 times
After usual trimming , etc see if rear quarter fits . On the no-name quarter I needed to take a slice out of the lower rear edge to get an acceptable fit with the rear valance. The AMD one was fine. It's not quite the right photo angle here but you can see the lack of rear tyre clearance.
IMG_3249.jpg
IMG_3249.jpg (72 KiB) Viewed 1411 times
IMG_3254.jpg
IMG_3254.jpg (84.47 KiB) Viewed 1411 times
Last edited by Matt on Mon May 20, 19 11:49 am, edited 1 time in total.
User avatar
MattH
Posts: 5806
Joined: Sun Apr 18, 04 10:56 pm
Location: Bedfordshire

Re: Matt's 1970 'Trans-Am' Cuda

Post by MattH »

Matt wrote: Mon May 20, 19 11:00 am Went to Silverstone a fortnight ago to see a mate race his modern mini with the CSCC . Amongst the stuff in the pits (apart from numerous mustangs) was this nice Camaro , which was racing in the 'Swinging Sixties' series. I can possibly squeak into this series with the Cuda, as E-body production started during '69.

IMG_3286.jpg
IMG_3287.jpg
That would be great to race in that championship, a friend races with a TVR and previously a Falcon.
Matt Hollingsworth - Vehicle Registrar
Panther Pink 73 Aussie Charger 265 Hemi 4 spd
Challenger Sam Posey Tribute car
User avatar
Matt
Posts: 1024
Joined: Sun Apr 18, 04 10:57 pm
Location: Matt Snowball, Tongham Surrey

Re: Matt's 1970 'Trans-Am' Cuda

Post by Matt »

Quarter fitted and tacked on in usual manner. I decided to joggle the edges rather than butt-weld them, as it would be much quicker, and reduces risk of distortion.
IMG_3255.jpg
IMG_3255.jpg (114.82 KiB) Viewed 1409 times
Ok now for the interesting bit. Using a bit of artistic licence, I'm retaining the original arch outline shape rather than curving it upward like in some of the historical photos.

Take newly installed quarter, slice around arch, pull out till it looks about right. I ended up about 1 1/4" further out than standard.
IMG_3256.jpg
IMG_3256.jpg (66.72 KiB) Viewed 1409 times
Slice upwards, pull sections of panel out, reshape, tack to arch lip using filler plates.
IMG_3260.jpg
IMG_3260.jpg (93.45 KiB) Viewed 1409 times
Carry on until you've got approximately what you were looking for. Pic shows halfway progress. After more welding, and lots of grinding, it had all gone somewhat better than I was expecting.
IMG_3263.jpg
IMG_3263.jpg (87.6 KiB) Viewed 1409 times
Over to George for the filler work ! The change in shape is actually quite subtle, and I could possibly have gone out further with the flare. We'll have to see what it looks like with paint on it.
IMG_3309.jpg
IMG_3309.jpg (79.25 KiB) Viewed 1409 times
Matt74
Posts: 1088
Joined: Mon Jan 05, 09 11:42 am
Location: Hampshire

Re: Matt's 1970 'Trans-Am' Cuda

Post by Matt74 »

This is the sort of thing that really interests me. Reshaping metal into what it should be or into a different shape like you have done.

I wonder how the factory cars where done? Probably the same way I would think.
User avatar
Stu Twin
Posts: 1177
Joined: Wed Apr 13, 05 1:32 pm
Location: 'itchin, 'erts

Re: Matt's 1970 'Trans-Am' Cuda

Post by Stu Twin »

Do you do breast enlargements?

:shock:
mygasser
Posts: 1041
Joined: Tue Dec 19, 17 10:36 am
Location: faversham, kent

Re: Matt's 1970 'Trans-Am' Cuda

Post by mygasser »

Stu Twin wrote: Mon May 20, 19 1:25 pm Do you do breast enlargements?

:shock:
Eat more fatty food and stop exercising :thumbright:
User avatar
mopar_mark
Posts: 6709
Joined: Fri Jul 14, 06 8:01 pm
Location: Windlesham, Surrey

Re: Matt's 1970 'Trans-Am' Cuda

Post by mopar_mark »

Matt74 wrote: Mon May 20, 19 1:16 pm This is the sort of thing that really interests me. Reshaping metal into what it should be or into a different shape like you have done.
Me too, it’s a great build & enjoyable to see the updates :thumbright:
"I spent a lot of money on booze, birds and fast cars. The rest I just squandered."
User avatar
Faux-7-0
Posts: 802
Joined: Mon Dec 03, 12 2:18 pm
Location: Reading

Re: Matt's 1970 'Trans-Am' Cuda

Post by Faux-7-0 »

I am loving this thread. (Particularly because I've got most of the same parts (Silver Sport Trans/Dr Diff rear disks/Hotchkis suspension) in boxes ready for Faux.)
Alan; whose 72 Challenger is inexorably taking over the house.
User avatar
MattH
Posts: 5806
Joined: Sun Apr 18, 04 10:56 pm
Location: Bedfordshire

Re: Matt's 1970 'Trans-Am' Cuda

Post by MattH »

That is brave but brilliant, welding new quarters on then cutting them up!!
Matt Hollingsworth - Vehicle Registrar
Panther Pink 73 Aussie Charger 265 Hemi 4 spd
Challenger Sam Posey Tribute car
User avatar
Pete
Posts: 21951
Joined: Sun Apr 18, 04 10:49 pm
Location: MMA Chairman

Re: Matt's 1970 'Trans-Am' Cuda

Post by Pete »

Brilliant work, Matt.

I assume you did the same thing with the Outer Wheel Housings?

Did you massage the Inner Wheel housings as well for more tyre space or just rely on the correct back spacing on the wheels?
Pete Wiseman; Cambridge.

Mopar by the grace of God
User avatar
Matt
Posts: 1024
Joined: Sun Apr 18, 04 10:57 pm
Location: Matt Snowball, Tongham Surrey

Re: Matt's 1970 'Trans-Am' Cuda

Post by Matt »

Hi Pete,

Outer wheel housings were simply extended directly sideways until they met the inner face of the quarter, where they were welded. This has left the arch lip itself unsupported, but it's quite rigid enough.

There were no tyre clearance problems with the inner wheel housings. At the end of the day an 8" rim doesn't seem to be *that* wide, even with a fairly fat tyre on it.

Cheers

Matt
User avatar
Derek
Posts: 7313
Joined: Sun Apr 18, 04 11:19 pm
Location: Surrey
Contact:

Re: Matt's 1970 'Trans-Am' Cuda

Post by Derek »

Coming along nicely matt. :thumbright: :thumbright: :thumbright:
Are we there yet dad ..... 10 to the gallon but worth it.

MMA Public Relations Officer.
MMA South London and Surrey Area Rep.
68Roadrunner
Posts: 841
Joined: Fri Nov 11, 05 9:39 pm
Location: Halifax, west yorks

Re: Matt's 1970 'Trans-Am' Cuda

Post by 68Roadrunner »

That’s some impressive work Matt,
Steaming ahead.
Richard.👍
User avatar
autofetish
Posts: 5599
Joined: Sat May 21, 11 6:43 am

Re: Matt's 1970 'Trans-Am' Cuda

Post by autofetish »

YOU


THE


MAN


Keep the updates coming


:study:
The closer you are to death the more alive you are
User avatar
Matt
Posts: 1024
Joined: Sun Apr 18, 04 10:57 pm
Location: Matt Snowball, Tongham Surrey

Re: Matt's 1970 'Trans-Am' Cuda

Post by Matt »

Back to trial-fitting the engine & box.

IMG_3230.jpg
IMG_3230.jpg (86.2 KiB) Viewed 1215 times

Note the odd shape of the Milodon road race sump. As I quickly found out, this makes it difficult to drop the engine and box in as one assembly, as the sump won't pass behind the K-member with the engine at an angle.


Quickest solution was to remove the K-member, and then replace it once the engine was hanging in position
IMG_3231.jpg
IMG_3231.jpg (83.37 KiB) Viewed 1215 times


With the engine installed, the sump does initially foul the K-Member in a couple of places:

We had to slice the corner off the RH mount pedestal (yes we did weld it up again later...)
IMG_3232.jpg
IMG_3232.jpg (72.34 KiB) Viewed 1215 times


and take the edge off this flat piece on the LHS
IMG_3241.jpg
IMG_3241.jpg (74.99 KiB) Viewed 1215 times


Not much upwards clearance here should the engine twist under torque- fortunately I'm fitting a torque strap. But we cut the lower corner off the pedestal as well just to make sure.
IMG_3243.jpg
IMG_3243.jpg (91.09 KiB) Viewed 1215 times
Post Reply