Dave Robsons Challenger R/T

Use this forum for all your builds in progress.

Moderator: Moderators

User avatar
Dave-R
Posts: 24752
Joined: Sun Apr 18, 04 11:23 pm
Location: Dave Robson lives in Geordieland
Contact:

Post by Dave-R »

I feel I have to balance between having the car other people would want (or buy) and having the car I want.

This time round I am doing the car I want. Something that is unique to me. A bit like you and your RoadRunner Dunc.

If I saw your wing car anywhere I would know who's it was. Or at least who built it even if someone else was standing next to it saying they own it.

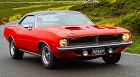
If I restored my car to original and went to a show in the USA I could park it up and not be able to find it again because there would be a thousand Challengers there looking exactly the same.

Nope. We are only here once. And recently I nearly wasn't. So stuff it. I am doing it my way. ;)
User avatar
Ivor
Site Admin
Posts: 13000
Joined: Sun Apr 18, 04 11:11 pm
Location: The village of Evenley

Post by Ivor »

Dave wrote:Nope. We are only here once. And recently I nearly wasn't. So stuff it. I am doing it my way. ;)
Spot on Dave, that's what I'm doing this time, before I get too old :oops:
The pump don’t work coz the vandals took the handles.

www.ivorsroadrunner.com
Guy
Posts: 5002
Joined: Sun Apr 18, 04 10:20 pm
Location: Behind a Camera

Post by Guy »

:iagree:

If all cars were meant to be the same there would never have been an options list .
Rich

Post by Rich »

I know its been said before but those door cards do look good.. :thumbright: :thumbright:
Do it your way!!!I`m all for that. :P :P to any one who dont like it..
User avatar
Dave-R
Posts: 24752
Joined: Sun Apr 18, 04 11:23 pm
Location: Dave Robson lives in Geordieland
Contact:

Post by Dave-R »

The Painless kit looks a bit scary when you first take it out of the box.

But it does not look so bad when you lay it out into its various sections.

Here are the various bits in roughly the area they need to be in.

This in itself took some time last night and I may change which way one or two wires route as it comes together.

Painless do help a lot in that each wire is labled and numbered all along its length.
Attachments
Ignition and engine temp/oil pressure are going in this direction. I am not sure exactly how yet.
IMG_2150.jpg (146.38 KiB) Viewed 496 times
Starter and charging system wires are going behind the fender. Along with the harness for the front lights.
IMG_2148.jpg (163.34 KiB) Viewed 496 times
The taillight section includes the dome light power and fuel sender wire.
IMG_2146.jpg (128.22 KiB) Viewed 496 times
These are the wires for the dash area. Quite a lot to sort through.
IMG_2145.jpg (132.51 KiB) Viewed 496 times
I mounted the fuse box to the left of the steering column.
IMG_2144.jpg (149.76 KiB) Viewed 496 times
Anonymous

Post by Anonymous »

That looks scary to me, electrics/wiring is voodoo where i'm concerned.
Anonymous

Post by Anonymous »

Looks good, Dave.

Patience is the key here.
User avatar
Dave-R
Posts: 24752
Joined: Sun Apr 18, 04 11:23 pm
Location: Dave Robson lives in Geordieland
Contact:

Post by Dave-R »

I am going to end up with a bald patch due to the amount of head scratching I am doing. :lol:
Guy
Posts: 5002
Joined: Sun Apr 18, 04 10:20 pm
Location: Behind a Camera

Post by Guy »

Dave wrote:I am going to end up with a bald patch due to the amount of head scratching I am doing. :lol:
Dont tell Simon that we said wiring was easy ;)
User avatar
mopar_mark
Posts: 6738
Joined: Fri Jul 14, 06 8:01 pm
Location: Windlesham, Surrey

Post by mopar_mark »

My mate used a universal kit for his 32 Ford, seemed a nice kit, as you say I like the way each wire is marked along its entirety with its identity.

MSD Digi system looks nice settled in the engine bay, good piece of kit too :thumbright:
"I spent a lot of money on booze, birds and fast cars. The rest I just squandered."
User avatar
Dave-R
Posts: 24752
Joined: Sun Apr 18, 04 11:23 pm
Location: Dave Robson lives in Geordieland
Contact:

Post by Dave-R »

It is a shame they don't supply a sticker on the MSD you can turn the other way up. But I wanted to be able to access the rpm limiter pots. I wouldn't be even able to see them if I put it the other way around.
I will probably remove it or cover it with something else.
Anonymous

Post by Anonymous »

Nifty air cleaner hold downs. Not noticed them before :D :thumbright:
User avatar
Dave-R
Posts: 24752
Joined: Sun Apr 18, 04 11:23 pm
Location: Dave Robson lives in Geordieland
Contact:

Post by Dave-R »

Courtesy of our Trev-D. ;)
User avatar
Pete
Posts: 22109
Joined: Sun Apr 18, 04 10:49 pm
Location: MMA Chairman

Post by Pete »

I thought "Painless" was very expensive for what you got, and what you got did not meet my needs; so I am scratch building my wiring solution for the Barracuda.

However, I understand that for many people this is the best way forward.

Keep up the good work, Dave. :thumbright:
Pete Wiseman; Cambridge.

Mopar by the grace of God
User avatar
Dave-R
Posts: 24752
Joined: Sun Apr 18, 04 11:23 pm
Location: Dave Robson lives in Geordieland
Contact:

Post by Dave-R »

I think if I was doing something more simple like a hot rod I would consider doing a scratch built one.

But for a first effort and with the complexity of some of the things I will be doing this seemed a good starting point for just over £200.
Post Reply