
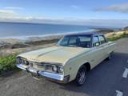
So tomorrow is MoT day and a while ago I decided to put in white front running lights and rear amber indicators on the '66 so there wouldn't be any issues.
I wanted something that maintained the look but got me an MoT pass so I got in contact with Nathan brightlightcustoms@hotmail.co.uk who I'd seen had done some custom LED light work for other cars.
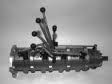
He supplied me two units for the front which have a cluster of clear LEDs on top and amber on the bottom. The wiring on the charger already allowed for this to be a direct swap but the only issue with the originals they had a single amber bulb in there which meant the running lights were amber so that had to be changed. Nathan's unit allowed for two separate light to be shown. To install this I found some BAY15D caps on eBay so I just grabbed them and soldered the LED boards on. This means that the new LED boards just plugged into the existing bulb socket. No splicing, no cutting - all very simple.
For the rear I got Nathan to make to small boards with clusters of amber lights. This required the typical work of running a new circuit from the brake lights switch to the rear of the car and this way the indicators could be broken off onto a separate circuit.
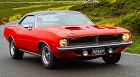
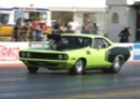
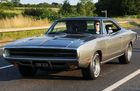
I've attached some shots below of what the lights looked like installed and overall I'm really happy with the end result. Nathan is a very helpful guy and I dropped off a front and rear light assembly to him so he could make the boards to fit and within 2-3 weeks I had taken delivery.
adrian.
Amber indicators
Moderator: Moderators
Amber indicators
- Attachments
-
- IMG_1015.jpg (52.61 KiB) Viewed 1479 times
-
- IMG_1017.jpg (54.42 KiB) Viewed 1479 times
-
- IMG_1018.jpg (98.99 KiB) Viewed 1479 times
-
- IMG_1019.jpg (92.49 KiB) Viewed 1479 times
Cost wise, I walked away with it all supplied for about £100. This included all LED light boards (two front, two rear), wiring, and the BAY15D caps. Then it was just my time installing it from there.
LED wise it's all bespoke. I had a chat with Nathan before we started about a few different options and settled on the simple one
adrian.
LED wise it's all bespoke. I had a chat with Nathan before we started about a few different options and settled on the simple one
adrian.
-
mopar_mark
- Posts: 6747
- Joined: Fri Jul 14, 06 8:01 pm
- Location: Windlesham, Surrey
fantastic!! what an excellent solution 
Si
1970 Charger 500
383 | 4bbl | 727 column | PAS | PAB | buckets/buddy - check out my photos HERE
If you don't want another same old brand-new car ... you could be DODGE MATERIAL
1970 Dodge Charger Registry - https://www.1970chargerregistry.com/
1970 Charger 500
383 | 4bbl | 727 column | PAS | PAB | buckets/buddy - check out my photos HERE
If you don't want another same old brand-new car ... you could be DODGE MATERIAL
1970 Dodge Charger Registry - https://www.1970chargerregistry.com/

Posted these before years ago ??
http://www.ebay.co.uk/itm/TWO-1157-2357 ... 4845960140
And this guy will make the right bulb for your car ....simple and cheap
I thankyou
http://www.ebay.co.uk/itm/TWO-1157-2357 ... 4845960140
And this guy will make the right bulb for your car ....simple and cheap
I thankyou
ALL KILLER NO FILLER
Nostalgia, its not what it used to be.
Carbon footprint of a Saturn V

Nostalgia, its not what it used to be.
Carbon footprint of a Saturn V
-
autofetish
- Posts: 5599
- Joined: Sat May 21, 11 6:43 am
Fantastic.... Like buses eh!
Im very tempted by the LED bulbs as no wiring changes needed. Only prob I have at the rear is the red lens, not sure if the amber LEDs on the bulb will just look red through the lens...
Thanks for both posts on this. Crops up all the time, great solutions!
Cheers Steve
Im very tempted by the LED bulbs as no wiring changes needed. Only prob I have at the rear is the red lens, not sure if the amber LEDs on the bulb will just look red through the lens...
Thanks for both posts on this. Crops up all the time, great solutions!
Cheers Steve
Bat Girl Stalker Living Petes Dream
-
Dave-R
- Posts: 24752
- Joined: Sun Apr 18, 04 11:23 pm
- Location: Dave Robson lives in Geordieland
- Contact:
The type that just swap for a regular bulb (like the one Allkiller mentions) tend to not look as bright and create a "hot spot" in the lens rather than illuminate evenly.Steve wrote:Fantastic.... Like buses eh!
Im very tempted by the LED bulbs as no wiring changes needed. Only prob I have at the rear is the red lens, not sure if the amber LEDs on the bulb will just look red through the lens...
The ones that are on a flat board look much better in operation.
Yes if you use amber bulbs they will show amber through the red lens. Just make sure they are BRIGHT.
I was...but sod legistation,
going to put two lots of the inner Cuda lights on the left and right and use the reverse part in the outer one to be the indicator.....but ask Lord Bananarama! to modify his 1930's Bentley to conform to EU ....not he'll just BS his way around it using his title
So stuff it they can stay as Ma Mopar intended.
But off my high horse now
The Cylindrical LED lights i posted are very bright and do give off a better all round light hence the NEW shape to eliminate the hot spot Dave is talking about. which does happen with LEDs
and yes the brighter Orange should show through but might be arguable as to it being orange or red to an awkward police officer
Use the reverse light if you can ? depending on design.
Oh the other thing i did in advance to help reduce hot spotting of the LED lamp was to split my rear light and Clean and Chrome spray the inner housing...as they are just black on the Cuda so very low reflective properties,
You could also put some lighting diffuser Gel ( its not Gel, its Film... but thats what its called) around the bulb or across the lenses from inside to help reduce the hot spotting by Diffusing the light and it wont burn..from theatre lighting shops or from me
But it will reduce the light output a little
You may also find your flasher unit wont like the lesser electrical switching load and flash faster than normal...you can buy load resistors to compensate for this and get them in rythmn again....also cheap and easy fix...they normally sell them at the same place that sells the bulb.
ALL KILLER NO FILLER
Nostalgia, its not what it used to be.
Carbon footprint of a Saturn V
Nostalgia, its not what it used to be.
Carbon footprint of a Saturn V