Anton's 68 Charger - 2012 Update
Moderator: Moderators


Well done Anton, it helps having a plotter doesn't it? 
I agree with Dave, the difficult bit is getting the bends right over the axle without them fouling the gas tank...although as Mr R said it was a bit of a hassle, I thoroughly enjoyed doing the job (with a bit of help from US Automotive's pipe bender) and was pleased with the final result.
Now all you've got to do is record the sound when you've finished and upload a WAV file!
Anyway, better get in the shed myself...lots to do!

MY exhaust stops before the rear axle so I'm not making the over axle pipe at the moment but when I do there is a place near Heathrow that sells the bend that goes over the axle so that will make it easy. I also have my old over axle pipes which will help with the routing of the new over axle pipes. The other reason I'm not making the over axle pipes yet is because I want to finish the rear anti roll bar first to make sure it won't interfere at all.
I'm a CAD operator at work and we have a plotter that has a 90 meter roll of paper so can print almost anything. It helps to draw it first to save on trial and error.
I'm a CAD operator at work and we have a plotter that has a 90 meter roll of paper so can print almost anything. It helps to draw it first to save on trial and error.
Well it's all welded up ready to be test fitted to the car which I'll do during the week and then I can Bananarama!.
The last two bits are only tack in place so they can be cut to length and have the reducers welded on once the exhaust is on the car to make sure it is straight and positioned correctly.
The last two bits are only tack in place so they can be cut to length and have the reducers welded on once the exhaust is on the car to make sure it is straight and positioned correctly.
- Attachments
-
- 12.JPG (132.86 KiB) Viewed 1345 times
-
- 11.JPG (121.86 KiB) Viewed 1345 times
-
- 10.JPG (132.33 KiB) Viewed 1345 times

For some strange reason I've missed this thread.
Hats off to you Anton, you know how to get you hands dirty and get stuck in.
Though I had my Charger done by a pro I'm currently doing a complete nut and bolt job on an E Type V12 and the amount of time taken is staggering even just looking, finding and exploring takes a whole heap of time.
So....I know why your doing it yourself, it gives you an immense feeling of self satisfaction.
Great Job
Nice one.
68 Charger 440R/T
66 Sting Ray 427
67 Mustang 390GT Man
68 Corvette Stingray Rdstr
08 FGT
66 Sting Ray 427
67 Mustang 390GT Man
68 Corvette Stingray Rdstr
08 FGT
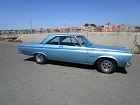
Got a nice surprise today my new wheels arrived and in a couple of days I should have my new wider(275) rear tyre's too.
I have chrome on steel wheel at the moment but I always wanted ali wheels and now I have them. I put the exhaust on the car today and finished fitting it to the car and it is all welded and once the welds are cleaned up it can go on for good. I'll take some pictures when it's done.
I have chrome on steel wheel at the moment but I always wanted ali wheels and now I have them. I put the exhaust on the car today and finished fitting it to the car and it is all welded and once the welds are cleaned up it can go on for good. I'll take some pictures when it's done.
- Attachments
-
- 9.JPG (108.61 KiB) Viewed 1292 times
-
- 10.JPG (114.4 KiB) Viewed 1292 times
Well I have spent the last couple of evenings in the garage fitting up my new exhaust and it is all complete now. It sounds excellent and I will upload a video so you can all hear.
- Attachments
-
- 1.JPG (102.85 KiB) Viewed 1228 times
-
- 2.JPG (113.93 KiB) Viewed 1228 times
-
- 3.JPG (111.41 KiB) Viewed 1228 times
-
- 4.JPG (95.37 KiB) Viewed 1228 times
nice job 
Anton , don't know if its the way the pictures is !! but becarefull , look at the driver side axle stand rear , looks like its close to the front of the rear chassis rail might slip up & dent , go through the floor
Anton , don't know if its the way the pictures is !! but becarefull , look at the driver side axle stand rear , looks like its close to the front of the rear chassis rail might slip up & dent , go through the floor
Last edited by steveo on Wed Oct 28, 09 8:55 pm, edited 1 time in total.

nice wheels
top job on the exhaust

top job on the exhaust
Si
1970 Charger 500
383 | 4bbl | 727 column | PAS | PAB | buckets/buddy - check out my photos HERE
If you don't want another same old brand-new car ... you could be DODGE MATERIAL
1970 Dodge Charger Registry - https://www.1970chargerregistry.com/
1970 Charger 500
383 | 4bbl | 727 column | PAS | PAB | buckets/buddy - check out my photos HERE
If you don't want another same old brand-new car ... you could be DODGE MATERIAL
1970 Dodge Charger Registry - https://www.1970chargerregistry.com/