I might as well get this going again since I have made some progress.
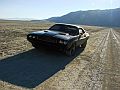
It all started back in 99 we bought this car for our 1st wedding present.
70 barracuda 383 auto 2 bbl, Gran Coupe , A/C ,80k miles
There is an article that was started in print in the connected mag, but since that has changed I decided I should at least post up what I have been doing the last few years.
it has been a long and hard road the car ended up having more rust that one can imagine.
so I can start with the first issue the bumper bolt ,so rusted it broke, this needed attention first ,to mount the car on the rotisserie
I have a fish story
Moderator: Moderators
I have a fish story
- Attachments
-
- DSC03476.JPG (41.4 KiB) Viewed 4809 times
-
- DSC03474patch.JPG (36.03 KiB) Viewed 4809 times
-
- DSC03473bumper bolt.JPG (38.97 KiB) Viewed 4809 times
-
- DSC03457bumper area.JPG (39.78 KiB) Viewed 4809 times
Last edited by drewcrane on Sun Nov 16, 14 4:29 am, edited 1 time in total.
Mounting on the rotisserie is pretty easy , great way to handle this type of project 
to start with the rust issues , here in the trunk some one installed aftermarket gauges and then cut a hole in the trunk and the tank to install the sender to operate the different gauges,just plain stupid the things people did to these cars
Eastwood does make a nice non toxic orange smelling undercoating remover , works quite well with an air scraper it comes off
- Attachments
-
- DSC03685east wood after.jpg (32.17 KiB) Viewed 4804 times
-
- DSC03683 eastwood before.jpg (40.15 KiB) Viewed 4804 times
-
- DSC07891.JPG (107.94 KiB) Viewed 4804 times
-
- DSC03593.JPG (30.71 KiB) Viewed 4804 times
I had to clean up the K frame and test fit the parts.
Stripped the whole car down to a shell,ready for the blaster
and got the car back from the media blaster they used star bright talings left over from mining aluminum ,perfectly round media
I also used a media shaker , they work very well for certain parts....the ones you can fit in it anyway
Stripped the whole car down to a shell,ready for the blaster
and got the car back from the media blaster they used star bright talings left over from mining aluminum ,perfectly round media
I also used a media shaker , they work very well for certain parts....the ones you can fit in it anyway
- Attachments
-
- DSC03807.JPG (28.47 KiB) Viewed 4800 times
-
- DSC04013.JPG (34.23 KiB) Viewed 4800 times
-
- DSC03803.JPG (34.18 KiB) Viewed 4800 times
-
- DSC03802.JPG (28.46 KiB) Viewed 4800 times
Ok now is the time when we really discovered all the rust , first with the front end.
A mouse or some small critter decided to make a nest inside the frame,
the only reason I know this is there was insulation inside the frame a place the factory would have never done,well it rusted out the inside of the frame (keep those small critters away .................far away).major frame repair.
then the car was wrecked on the drivers side so the frame was bent up on the drivers side,needing a frame puller luckily my long time mate Jim Weyand (69 AMX Certified 180mph car) he has one in his garage ,as well as frame alignment hangers ,as well as the factory Manuel for the correct measurements
- Attachments
-
- DSC04430.JPG (22.66 KiB) Viewed 4796 times
-
- DSC04426.JPG (37.02 KiB) Viewed 4796 times
-
- DSC04429.JPG (24.6 KiB) Viewed 4796 times
-
- DSC04425.JPG (29.71 KiB) Viewed 4796 times
Now that is sorted ,we moved to the front inner fender aprons , the were trashed , so away they went,as well as the top of the cowl,scuttle what ever you want to call it
- Attachments
-
- DSC04503.JPG (33.96 KiB) Viewed 4792 times
-
- DSC04419.JPG (39.65 KiB) Viewed 4792 times
-
- DSC04421.JPG (40.09 KiB) Viewed 4792 times
-
- DSC04411.JPG (30.48 KiB) Viewed 4792 times
Ok more inner frame rus required removal of parts of the floor,my budget didt not allow me to purchase a whole floor and it was not necessary since the rust in this srea was isolated in the driver floor area due to the windshield leaking and it ran all down the inside and trashed the floor/frame area.
This area was then sand blasted by me and my handy portable cheap but works well sand blaster,and then treated with Por 15 a marine grade epoxy.
Then we fabbed up some reinforcement plates for both sides around the torsion bar mounting area now this will be very strong
This area was then sand blasted by me and my handy portable cheap but works well sand blaster,and then treated with Por 15 a marine grade epoxy.
Then we fabbed up some reinforcement plates for both sides around the torsion bar mounting area now this will be very strong
- Attachments
-
- DSC04554.JPG (29.56 KiB) Viewed 4789 times
-
- DSC04548.JPG (29.75 KiB) Viewed 4789 times
-
- DSC04539.JPG (23.91 KiB) Viewed 4789 times
-
- DSC04534.JPG (24.91 KiB) Viewed 4789 times
I have another long time mate the has been doing body work for 40 years and he was slow so lucky me he cut and welded all this for $1500.00 bucks , great to have friends like Doug Demots, he has a Cobra he runs speed challenges one in Texas he has one his class the last 9 out of 10 years he knows cars very well
Now to the rear of the car and yes by now you know it all had to go the only part of the car we saved was the roof.floor and frame and the inner structure.
This area was sand blasted by me and my home made tent
Now to the rear of the car and yes by now you know it all had to go the only part of the car we saved was the roof.floor and frame and the inner structure.
This area was sand blasted by me and my home made tent
- Attachments
-
- DSC07013.JPG (79.86 KiB) Viewed 4785 times
-
- DSC07007.JPG (93.61 KiB) Viewed 4785 times
-
- DSC07002.JPG (96.41 KiB) Viewed 4785 times
-
- DSC06986.JPG (84.04 KiB) Viewed 4785 times
Test fit of the panels and of course noting fits it never does it is merely impossible to get a jig that can replicate how the factory set things up , but Doug Got it to go the guy is incredible
- Attachments
-
- DSC07113.JPG (68.86 KiB) Viewed 4781 times
-
- DSC07112.JPG (54.6 KiB) Viewed 4781 times
-
- DSC07109.JPG (79.43 KiB) Viewed 4781 times
-
- DSC07028.JPG (82.19 KiB) Viewed 4781 times
Most all the panels were welded off the rotisserie ,on the suspension to avoid warped panels.
A test fit of doors,and fenders is a must before final welding.
And a coat of Por 15 ,before other panels are welded .
Followed by 3 cans of Eastwood frame sealer ,they have nice extender tubes to reach all the way through the frame
A test fit of doors,and fenders is a must before final welding.
And a coat of Por 15 ,before other panels are welded .
Followed by 3 cans of Eastwood frame sealer ,they have nice extender tubes to reach all the way through the frame
- Attachments
-
- DSC07137.JPG (73.48 KiB) Viewed 4776 times
-
- DSC07130.JPG (82.68 KiB) Viewed 4776 times
-
- DSC07127.JPG (74.85 KiB) Viewed 4776 times
-
- DSC07117.JPG (85.22 KiB) Viewed 4776 times
Then I used 5 tubes of seam sealer ,hand pressed in to each and every seam, way more than the factory could do
As well as a smoother,better rubberized undercoating.
Again another test fit of the grille and fenders
and a purchase of some 71 tail light housings,off subject but they were on e bag for a bargain
As well as a smoother,better rubberized undercoating.
Again another test fit of the grille and fenders
and a purchase of some 71 tail light housings,off subject but they were on e bag for a bargain
- Attachments
-
- DSC07209.JPG (93.36 KiB) Viewed 4772 times
-
- DSC07205.JPG (90.26 KiB) Viewed 4772 times
-
- DSC07187.JPG (85.19 KiB) Viewed 4772 times
-
- DSC07185.JPG (89.85 KiB) Viewed 4772 times
After the V.P. trip suspension upgrades were made,with donated steel and welding from my mate Jim I fabbed these up
Also did a resto on the tail lights
Also did a resto on the tail lights
- Attachments
-
- cuda 12 2 13 006.jpg (94.45 KiB) Viewed 4768 times
-
- DSC07903.JPG (66.92 KiB) Viewed 4768 times
-
- DSC07864.JPG (50.95 KiB) Viewed 4768 times
-
- 71 light rstyo 001.jpg (108.83 KiB) Viewed 4766 times
Ok the so called rare as hens teeth "71 cuda grille" these things are a real work of art when I sat down and realized the time, effort,labor,and design that weht in to souch a creation, the detail, the paint work, the stainless trim ,the mounting areas, just an amazing bit of work .................no wonder they only made em for one year the execs probably went nuts with the labor costs alone .
I have well over 100 hours restoring one (I have 2 one I had to use the whole end from another grille to make it work), not including my wife who did the hours of tape work,and as soon as I get one done(I have collected 3 1/2 grilles to make 2),they are now available for $1200.00,no worries I learned alot and can now fix them and I still only have about $500.00 in materials in 2 of them
I have well over 100 hours restoring one (I have 2 one I had to use the whole end from another grille to make it work), not including my wife who did the hours of tape work,and as soon as I get one done(I have collected 3 1/2 grilles to make 2),they are now available for $1200.00,no worries I learned alot and can now fix them and I still only have about $500.00 in materials in 2 of them
- Attachments
-
- 71 CUDA GRILLE 002.jpg (97.37 KiB) Viewed 4760 times
-
- grille repair 001.jpg (68.7 KiB) Viewed 4760 times
-
- cuda 006small grille.jpg (66.14 KiB) Viewed 4760 times
-
- cuda 005grille.jpg (116.75 KiB) Viewed 4760 times
Ok another area that I saved a ton of money the............. dash pad if you are not in to concourse restos and simply want a nice ,clean alternative,
I have had an inexpensive dash "cap' on my chally for years and no body seems to notice, it aint cracked, warped and still has a nice flat sheen so no sun glare for all concerned, sun glare is really bad off the dash,
so I found one at a local show for $89.00 .......yea beats the alternative,
shipping a (dash core since you will need your vin tag on the frame) $1200.00 dash all the way to the U.K. and then shipping it back ,well a cap would work for me here are some pics
Also I have TTI headers they are made to fit a 383 chally...........they do fit after some modes , using some odd lengths of rods I used one from a columnn shift car,in reverse so it will clear the flange,I also useed a bfh on the trans side it hit the trans pan(no pics necessary)
I will be using a Lokar cable so I will be eliminating the stock rod linkage system for the kick down.
but I did notice this they dont hang down as low as a 440 tti header they have about one more inch of ground clearance so that will be nice for the street.
I will post more tomorrow................just stay tuned if you are interested in what this Yank is doing in V.P.VILLE
- Attachments
-
- CUDA 4 -7 -13 003.JPG (51.78 KiB) Viewed 4755 times
-
- cudandash fit 001.jpg (122.85 KiB) Viewed 4755 times
-
- cuda dash 006.jpg (120.89 KiB) Viewed 4755 times
-
Rogue Trooper

- Posts: 1792
- Joined: Wed Feb 01, 06 8:19 pm
-
hjworton