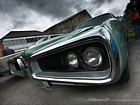
but fortunately pretty much confined to the front foot well below the pedals, water must have been getting in for years from the rust damage above
around the air intake aperture download/file.php?mode=view&id=128258
Moderator: Moderators


Your Challenger is looking great. re shattering grinding discs I use flap discs, power files, rotary files and roloc discs for dressing down welds. Never had a problem and in most cases you can't see it's been repaired.newsatten wrote: ↑Sat May 23, 20 1:36 pm download/file.php?mode=view&id=128308
I decided not to spend hours dressing the welding in these dodgy confined spaces, as i got badly injured when dressing the welding on a passenger front footwell on a series 3 E some time ago, the dis'c broke up a cut my chin which needed 10 stitches!
few inches lower and it would have been my throat!
So im now gun shy grinding etc in tight spaces!
Beware.......................
And being
realistic all this completely disappears once the felt/carpet, heater box etc