Disc brake conversion, 68 Charger.

Moderator: Moderators

Anonymous

Disc brake conversion, 68 Charger.

Post by Anonymous »

Thinking of putting power discs on the front of my 68 Charger. Does anybody know if you have to change the brake pedal, or mess around under the dash. Spent enough time under there recently.
Also can anybody recommend any kits, price being high on the agenda.
There is a shop on ebay, that I was directed to, does anybody know if they are OK. :help:
User avatar
Pete
Posts: 21951
Joined: Sun Apr 18, 04 10:49 pm
Location: MMA Chairman

Post by Pete »

Done this LOADS of times.

The best "Bolt on" Mod you can do, but M/C will also need a change. No other changes such as brake pedal. I have tended to stick with "orignal" discs, so have had to change the spindles as well. Other kits will bolt on to original drum spindles.

It would seem the trick is getting the appropriate pad material - too hard and it still will not stop.
Pete Wiseman; Cambridge.

Mopar by the grace of God
Anonymous

Post by Anonymous »

:) What's the best place to get them PETE and at what sort of price :?
User avatar
Pete
Posts: 21951
Joined: Sun Apr 18, 04 10:49 pm
Location: MMA Chairman

Post by Pete »

I have done upgrades using 2nd hand parts with new calipers and rotors, and other kits that are no longer available.

You just have to get on the net and research it, or phone around some of the dealers in the Traders section of this site. It all depends on what you want, how long you are prepared to wait for it (shipping, etc) and how much you are prepared to pay.
Pete Wiseman; Cambridge.

Mopar by the grace of God
User avatar
Dave-R
Posts: 24751
Joined: Sun Apr 18, 04 11:23 pm
Location: Dave Robson lives in Geordieland
Contact:

Post by Dave-R »

There are kits out there that use your original drum brake steering knuckle but they tend to be expensive.

The cheapest way is used parts but these are MUCH harder to find.

Some of us have used this guide for parts.

http://www.moparaction.com/tech/archive/disc-main.html
User avatar
Dave999
Posts: 9432
Joined: Thu Feb 24, 05 10:31 am
Location: Twickenham,London, England

Post by Dave999 »

do you have to swap the pushrod on the brake peddle to the other hole for chaning from standard to servo brakes????

thought i'd read that but never done brake fiddeling so can't confirm


if a B body has the same caliper mount to an A Body you could try

either B or A body disk spindles and hubs

new rotors

and follow this written by Dartman on the moparmarket board. he lives in perth and drives a US dodge dart rather than the aussie equivelent

Moyota 4 spot calipers
Written by Todd Teasdale
2006 ver3
I did the first conversion several years back now (2002) and wrote this How to convert to Toyota 4 spot calipers
due to the interest and number of queries. Its being used quite regularly here in the west now. There are two types of caliper that will just about bolt straight onto the mopar mounts. Not sure about the B body here but definitely A bodies/ OZ Valiant stuff.

TOYOTA CALIPERS
1) There are two suitable calipers. The calipers found on the FJ/HJ or 60 series Landcruisers are suitable and are also used on some early model Hiluxs. This is a 4 spot caliper that has two different sized pistons (4 in total) and some cooling fins. The leading piston is smaller than the trailing ones i.e. two small opposing and two big opposing pistons. See picture in hyperlink below.

2) The second suitable style are the ones used on the Toyota HZJ75 series prior to about 95. They are about 20% bigger than the ones above. The difference being is that it has 4 pistons of the same size, which makes it slightly longer and hence a slightly bigger pad.

The following link shows the larger HZJ75 caliper and pad (red) vs the smaller 60 series Landcruiser unit (also red and in the centre) and the original unpainted Chrysler Girlock caliper that I removed.

http://i7.photobucket.com/albums/y268/d ... fe69b2.jpg

Note: Both of these are available new from Veale's for a reasonable price. Second hand they can also be bought very cheap. Overhaul kits are also available for both and also very cheap. The smaller 60 series caliper is the better for a straight replacement. The larger ones really need some brake proportioning work depending on what sort of booster your Chrysler is running standard. Don't get me wrong, it will still work brilliantly but rear drum brakes may lock in emergency stops (pretty par for course actually).

There is a large range of pads so experiment with too. The big plus, is that you have a platform to improve the whole braking system from here on in. The most noticeable change is that the brakes won't pull on either side first, it is very even and you are not fighting to keep the car in a straight line. You have a lot more feel and can therefore go harder on the pedal.

PROCEDURE
1) Find the correct Toyota 4 spot calipers for your needs.

2) Remove your old Chrysler calipers and do a quick mount-up of the new calipers to see what your up against. They will almost bolt straight on, but you will need to do a few things so they look and work like factory calipers.

3) Do some quick eye-balling at this stage of your own.
In my case, I had the small bolt pattern vented disk set-up ala 1970 Dart/VG. Outer diameter of the standard rotor is 279.4 with a PCD of 101.6 mm (4 small bolt pattern). I took 2-3 mm off the OUTER diameter of the rotor. Down to around 275 mm. The VH-VK and CH-CK have 282 mm diameter rotors and therefore may need more off. This is simply to clear the inside arc of the caliper itself. The CL-CM had different offset on the disc (56.5 mm vs 62 mm) so you would need to change the rotor as well.

4) Whilst that's being done at the brake shop, new or old you will need to split the Toyota calipers apart. Simply four bolts. This is so you can open up the central rotor slot in the caliper by about 2-3 mm on each side. Test this by putting caliper over the rotor. You don't need to do this if using a solid rotor, but please go the vented ones if your upgrading your VF brakes. I used a small angle grinder with a thick cutting disk rather than a grinder disk. Cutter disks don't like sideways force so don't Bananarama!, take your time and use safety goggles. The Chrysler vented disc should now happily fit within them. DBA do replacement rotors for the Valiants;- DBA201 for VC-VF, DBA204 for VG early and DBA202 for VG-CL (Girlock calipers).

5) Okay. The Toyota stuff is METRIC! So a couple little mods must be done here. The caliper mounting bolt holes (x2) are a little bigger than the Chrysler caliper bolt holes. The simplest thing to do here is fit a sleeve between the standard imperial bolts and your new caliper. Thus retaining the old mounts and the old retaining bolts. I used some copper pipe pressed in with my vice and then filed it out for a neat fit. I noticed that Suzuki Sierra locating dowels, between the engine and gearbox, appear to be a perfect fit but as yet untried. Steel bushes can also be made. Clean up either side with the grinder so the caliper sits flush.
Note: You could also remove the mounting stub and have a machine shop re-thread the two caliper mount holes to accept the same metric bolts as the Toyota. Probably the strongest but more costly method.

6) Thoroughly clean the calipers and join back together. No sealant is required. Just REMEMBER the O ring seals. Paint them what ever colour you like. I recommend VHT caliper paint here.

7) One more critical thing to do, but also very easy. Take your flexible brake line, the one that goes from the chassis to the caliper (see top picture again) to a brake hose specialist (I used Perth Brake Supplies, Welshpool) and get them to make two new braided steel lines the same length as the originals. The chassis end needs to retain the same Chrysler imperial 3/8? NPT thread BUT the other end needs to fit the metric sized, Toyota caliper (10 mm from memory). Take the caliper and brake line in for easy reproduction.
Note: It will be the banjo style brake-line with bolt through centre. Ensure they give you the right bolt for the right Banjo. Some utilize a grooved bolt and some utilize a grooved Banjo for the hydraulic fluid to flow through. You must have the right combination otherwise the fluid will not pass through it and into the caliper and therefore the brakes will not work. Also, you MUST put in two new copper washers to seal the banjo/bolt/line.

One last thing. You may have notice that as the Toyota pads wear, they may begin to touch on the hub of the disk. This may depend on the pads you use but you can rectify any future problems at this stage by taking a bit off the internal radius of the pad ie situated on the hub side of the pad. A bench grinder will do this nicely. You need only do the outer pad, but make sure you put it on the outside of the caliper!

Picture in link shows smaller 60 series caliper on top and 75 series caliper below;
http://i7.photobucket.com/albums/y268/d ... 1504ac.jpg

9) The most critical stage. Once you have re-assembled everything…. bleed the brakes, turn both the wheels by hand and check your work. It should spin freely. Then TEST, TEST, TEST, before you even go out onto the road. Then when you're on the road, TEST again in a safe spot before building up speed. In a safe place do some emergency stops as well. Do not test whilst coming down a steep hill or driveway. Then check your handy work again back home for leaks.

Please use common sense, because you a updating the most important part of any vehicle.

http://i7.photobucket.com/albums/y268/d ... ounted.jpg

Best of luck

Todd


Dave
The Greater Knapweed near the Mugwort by the Buckthorn tree is dying
Anonymous

Post by Anonymous »

This is a question I also have - my 68 Charger has non power drums all round and I don't like the sound of that with a big block up front. Are disc conversions a lot more expensive than servo boosted drums?
User avatar
Pete
Posts: 21951
Joined: Sun Apr 18, 04 10:49 pm
Location: MMA Chairman

Post by Pete »

Drums are still drums - they grab and fade.
Get discs.
Pete Wiseman; Cambridge.

Mopar by the grace of God
User avatar
Matt
Posts: 1024
Joined: Sun Apr 18, 04 10:57 pm
Location: Matt Snowball, Tongham Surrey

Post by Matt »

Re - 68/69 B-bodies

Factory power brake cars (both disc & drum) used the same pedal as manual brake cars (I think) , but had a crank assembly under the dash, between the pedal and master cylinder. This allowed the pedal to sit closer to the floor than manual brake cars, at the expense of reduced effort on the master cyl pushrod. (not such a problem with power assistance)

there's two main routes to disc conversion :

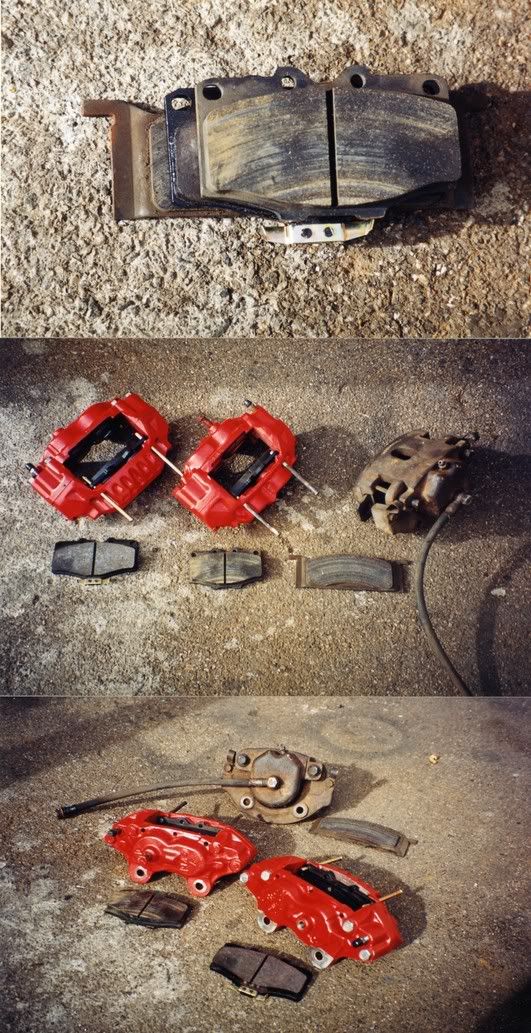
1) Factory Parts - this is the conversion I did on my 69 Coronet R/T. Uses parts from 73 Challenger rather than 68/69 B Body parts which are effectively unobtainable.
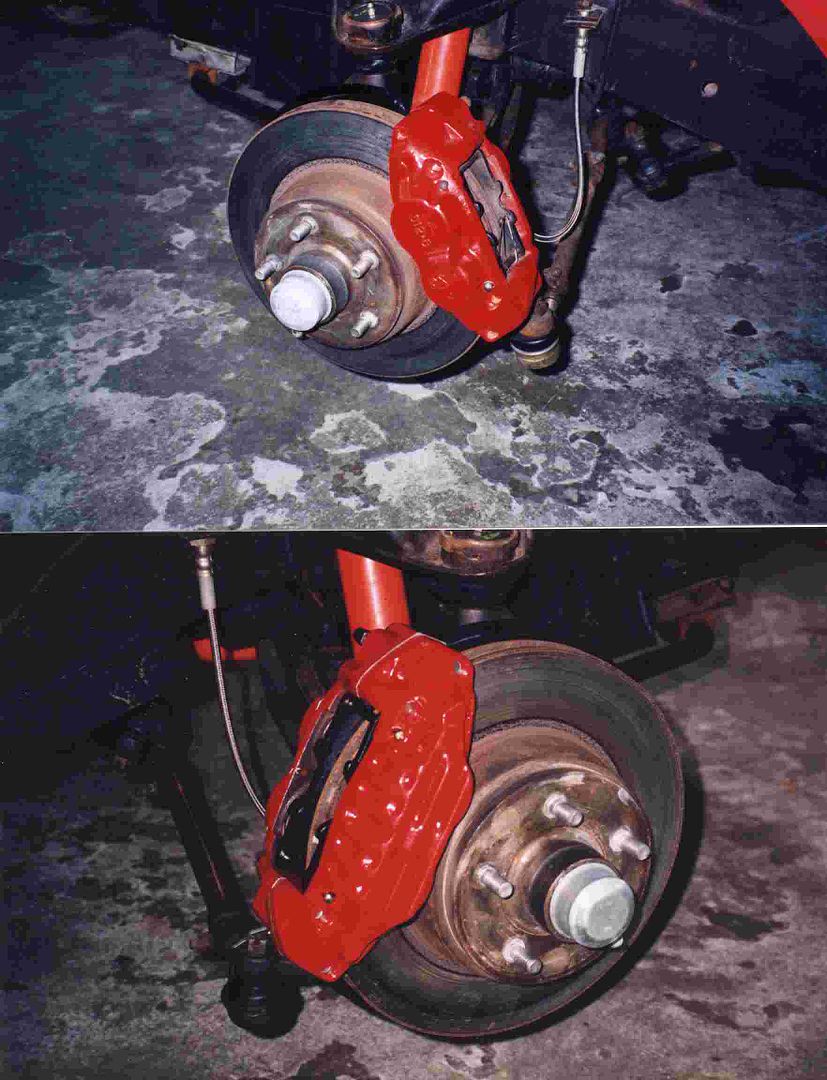
a)Uprights, calipers, discs, etc from '73 Challenger or similar. Uprights will have to be swapped L-R so that calipers become rear mounted, to clear sway bar hardware.
b)custom flexibles, obtainable from www.magnumHP.com
c) 73 challenger master cyl.
d) factory crank linkage & booster from 68/69 B-Body

as you can see this is complicated, and uses hard to find parts

far better to

2) Spend approx $900 with SSBC, master power brakes, or similar , for a complete bolt-on kit. Much easier . Well worth any extra expense.
comments:
a) Power kit will bolt straight onto manual brake pedal. No crank assy needed.
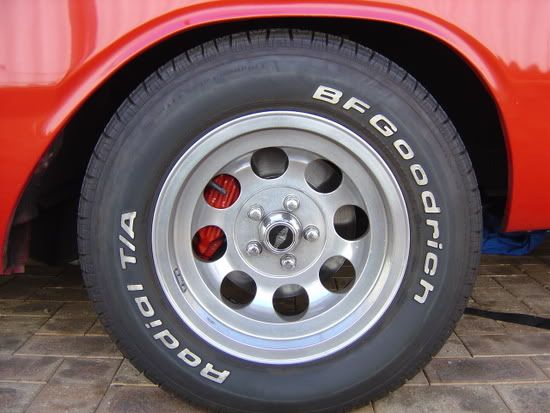
b) Some 14" plain steel wheels MAY foul the calipers. 14" magnums seem OK .
c) I fitted an SSBC power disc kit to my 68 manual drum Charger R/T . I had a few small installation problems due to manufacturing defects, but SSBC sent new parts without fuss (to the UK as well) . Pedal feel and braking effect is now excellent.
Last edited by Matt on Thu Jul 31, 08 10:40 pm, edited 3 times in total.
User avatar
Pete
Posts: 21951
Joined: Sun Apr 18, 04 10:49 pm
Location: MMA Chairman

Post by Pete »

I think you have to be careful on the SSBC pads, Brutus and I came across this, and the "as supplied" options are too hard for road use.....
Pete Wiseman; Cambridge.

Mopar by the grace of God
User avatar
Matt
Posts: 1024
Joined: Sun Apr 18, 04 10:57 pm
Location: Matt Snowball, Tongham Surrey

Post by Matt »

Actually Pete now you come to mention it the Charger is really good, but the blue 68 Coronet stroker has an SSBC kit as well, and the brakes don't bite at all. In fact they're quite worrying. It was on my list of things to diagnose, and you may have saved me several hours of head scratching.
User avatar
Pete
Posts: 21951
Joined: Sun Apr 18, 04 10:49 pm
Location: MMA Chairman

Post by Pete »

Glad to be of assistance. I believe the magic formular is D34 material, as used on Mustwangs...
Pete Wiseman; Cambridge.

Mopar by the grace of God
User avatar
Jon
Posts: 1874
Joined: Sun Apr 18, 04 11:06 pm
Location: Preston

Post by Jon »

Am I right in thinking the mpbakes kit is basically a factory set up but brand new?
http://www.mpbrakes.com/products/list.c ... product=93
they have the spindles you need for a factory conversion if you cant find second hand..they're mentioned in Daves mopar action link as a source for parts so they must sell them separately...

just suspension do a brembo kit but its expensive...

I was going to buy SSBC but nobody seems happy with them out of the box so I dunno now....
User avatar
Dave-R
Posts: 24751
Joined: Sun Apr 18, 04 11:23 pm
Location: Dave Robson lives in Geordieland
Contact:

Post by Dave-R »

The brake pads I bought from Richard Ehrenberg have always been too hard. Never got around to changing them though because I am not sure exactly what they are or what models used them.

The calipers are big single piston sliders (not floating pin). Anyone know what model mopars would have come with these as standard?
User avatar
Matt
Posts: 1024
Joined: Sun Apr 18, 04 10:57 pm
Location: Matt Snowball, Tongham Surrey

Post by Matt »

the MP brakes setup looks effectively similar to 70-up factory. It should be fine.

I wouldn't necessarily go as far as Brembo stuff on the road. The stock stuff is quite OK . Some of the racing-type calipers don't have very effective weather protection for the piston seals.
Post Reply