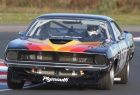
Matt's 1970 'Trans-Am' Cuda
Moderator: Moderators

Re: Matt's 1970 'Trans-Am' Cuda
Matt, you never cease to amaze me. You obviously have a 36 hour day, or don't need sleep. Fabulous.
Matt Hollingsworth - Vehicle Registrar
Panther Pink 73 Aussie Charger 265 Hemi 4 spd
Challenger Sam Posey Tribute car
Panther Pink 73 Aussie Charger 265 Hemi 4 spd
Challenger Sam Posey Tribute car
Re: Matt's 1970 'Trans-Am' Cuda
It helps being able to rope in your employees here and there. I have one guy who is an excellent mechanic, electrician, woodworker, metalworker, you name it. I've drawn up the wiring diagram and he's following it.
I'm actually quite frustrated at the moment at not having enough time to spend on the car - it feels like it's almost finished now. Everything is here ready to fit, and we're just not getting the time due to more pressing stuff like actually doing real paid work and keeping customers happy ! Any time at home is mostly spent finishing off the landscaping around the house.
Anyway we're due to start on car again on Friday morning, so hopefully there'll be more progress to show by mid next week.
Cheers
Matt
Re: Matt's 1970 'Trans-Am' Cuda
Bit more progress with the finishing jobs
Fitted the new AMD windscreen, after installing the clips for the reveal moulding .
Used 10mm butyl rubber strip. All went well until I left the car out in the sun and the screen started creeping down over the course of a day. Managed to slowly and gently wedge it back up again and then installed rubber blocks underneath (which I should have done to start with...)
I started work on the reveal mouldings at the same time. The car came with several sets for the rear screen , however they all look like they've been in a bonfire. I cannot imagine why.
Fortunately it buffed out , but took a lot of time and effort
Carrying on with the wiring, time to install the dash. Sat in the car holding the steering wheel in mid air, and drew the gauges on where I could easily see them.
I had thought about getting gauges from the States, but ended up using a British company ETB Instruments. Quality looks nice . I went for full electronic speedo, as the Tremec box has a compatible sender built in.
The amber warning light is for the alternator, the red one for the oil pressure. I've been saving these for ages - they came from a generator control panel and they're beautiful quality. Only problem is they take obsolete telephone 'slide' bulbs, but I found some on ebay without too much difficulty.
The larger red light in the middle is a shift light, which runs directly off the tach.
Fitted the new AMD windscreen, after installing the clips for the reveal moulding .
Used 10mm butyl rubber strip. All went well until I left the car out in the sun and the screen started creeping down over the course of a day. Managed to slowly and gently wedge it back up again and then installed rubber blocks underneath (which I should have done to start with...)
- IMG_3564.jpg (78.16 KiB) Viewed 2807 times
- IMG_3627.jpg (99.42 KiB) Viewed 2807 times
- IMG_3629.jpg (106.25 KiB) Viewed 2807 times
- IMG_3583.jpg (80.4 KiB) Viewed 2807 times
- IMG_3593.jpg (78.51 KiB) Viewed 2807 times
- IMG_3611.jpg (85.71 KiB) Viewed 2807 times
The larger red light in the middle is a shift light, which runs directly off the tach.
Last edited by Matt on Fri Jun 28, 19 11:27 pm, edited 1 time in total.
Re: Matt's 1970 'Trans-Am' Cuda
Engine mated to gearbox with hydraulic clutch release bled and attached
Dropping it in - hopefully for the last time in a while.
However since the clutch master is in a non- standard position, the flexible hose from the release bearing won't reach. Difficult to find a union to extend a male 3/8 fitting with a female flare. Fortunately I had a couple of 3/8- M10 adaptors in the parts pile, and they were an average fit into a BSP coupler, so I screwed it all together and soldered it up to seal the threads.
- IMG_3592.jpg (99.04 KiB) Viewed 2801 times
Dropping it in - hopefully for the last time in a while.
- IMG_3598.jpg (100.5 KiB) Viewed 2801 times
- IMG_3637.jpg (49.38 KiB) Viewed 2801 times
- IMG_3646.jpg (63.3 KiB) Viewed 2801 times
Last edited by Matt on Fri Jun 28, 19 11:28 pm, edited 1 time in total.
Re: Matt's 1970 'Trans-Am' Cuda
Starting on the exhaust system.
Despite the fact that the Tremec transmission will not install *any* higher , since it's about 8mm off the Torsion bar crossmember, I still get the impression that the engine/trans assembly is tilted back more than standard.
Quite a lot of clearance between headers and crossmember, and tti headers and H-pipes not meeting at correct angle.
Hopefully there will be enough ground clearance once it's all done.
The intention is to have a side exit exhaust just ahead of the rear wheels like on the race cars. I've bought a selection of standard parts which should let me accomplish this, however I'll wait till the car's on the ground before going any further as I'm not sure if there are going to be any ground clearance issues with the exit pipes.
Despite the fact that the Tremec transmission will not install *any* higher , since it's about 8mm off the Torsion bar crossmember, I still get the impression that the engine/trans assembly is tilted back more than standard.
Quite a lot of clearance between headers and crossmember, and tti headers and H-pipes not meeting at correct angle.
- IMG_3638.jpg (61.79 KiB) Viewed 2800 times
- IMG_3640.jpg (116.89 KiB) Viewed 2800 times
Hopefully there will be enough ground clearance once it's all done.
The intention is to have a side exit exhaust just ahead of the rear wheels like on the race cars. I've bought a selection of standard parts which should let me accomplish this, however I'll wait till the car's on the ground before going any further as I'm not sure if there are going to be any ground clearance issues with the exit pipes.
- IMG_3648.jpg (108.99 KiB) Viewed 2800 times
- IMG_3660.jpg (82.41 KiB) Viewed 2800 times
- IMG_3662.jpg (67.03 KiB) Viewed 2800 times
Last edited by Matt on Fri Jun 28, 19 11:32 pm, edited 1 time in total.
Re: Matt's 1970 'Trans-Am' Cuda
Mini Denso alternator and bracket bought from a member a few months ago.
Had to make a 3mm spacer to bring the water pump pulley into alignment
Modified Ford radiator in place . Raided the hose box, and happily found that a B-Body big-block lower hose (although I think it's mounted back to front..) is just the job.
- IMG_3649.jpg (113.67 KiB) Viewed 2800 times
- IMG_3650.jpg (94.7 KiB) Viewed 2800 times
- IMG_3651.jpg (110.1 KiB) Viewed 2800 times
Modified Ford radiator in place . Raided the hose box, and happily found that a B-Body big-block lower hose (although I think it's mounted back to front..) is just the job.
- IMG_3632.jpg (104.6 KiB) Viewed 2800 times
- IMG_3634.jpg (65.56 KiB) Viewed 2800 times
-
Super Sloth

- Posts: 692
- Joined: Wed Oct 07, 15 6:46 pm
Re: Matt's 1970 'Trans-Am' Cuda
Yes thanks Super Sloth the stainless is looking much better . I could probably do with a polishing mop that isn't forty years old, and the right sort of buffing soap, but I'm pretty pleased overall.
General assembly continues without any major hiccups.
Hotchkis front suspension all OK
Instructions confirm you will have to grind for clearance around this allen bolt
but don't mention the fact that front of A-arm may foul frame rail near pivot on rebound. Soon cured with the grinder
Dr Diff brake conversion kits good so far, but instructions either vague or lacking. No torques given for any fasteners.
Definitely startng to look like a car now . Doors and wings are still with the painter, and now he's gone on holiday for a week !
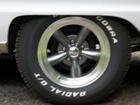
I'm about to order some real Minilite wheels in white which should give me a more authentic look.
General assembly continues without any major hiccups.
Hotchkis front suspension all OK
Instructions confirm you will have to grind for clearance around this allen bolt
- IMG_3668.jpg (71.57 KiB) Viewed 2798 times
- IMG_3665.jpg (72.38 KiB) Viewed 2798 times
Dr Diff brake conversion kits good so far, but instructions either vague or lacking. No torques given for any fasteners.
Definitely startng to look like a car now . Doors and wings are still with the painter, and now he's gone on holiday for a week !
I'm about to order some real Minilite wheels in white which should give me a more authentic look.
- IMG_3678.jpg (86.92 KiB) Viewed 2798 times
- IMG_3680.jpg (90.35 KiB) Viewed 2798 times
- IMG_3682.jpg (101.15 KiB) Viewed 2798 times
-
Super Sloth
- Posts: 692
- Joined: Wed Oct 07, 15 6:46 pm
Re: Matt's 1970 'Trans-Am' Cuda
I have a box of similarly aged mops and soaps from my Grandfathers old metal finishing business.
If it works don't knock it! I think many of us would have written them off as a lost cause.
If you know your fastener diameter, thread pitch and strength there's little tables you can look up online to get max torque settings. Pain in the bum looking every fastener up but it gets you out of a bind when you're working with less informative kits and peace of mind that nothing is over done.
-Jon.
-
ScottyDave

- Posts: 1681
- Joined: Sun Mar 08, 15 9:38 pm
- Location: Dave Evans: MMA 130, Worcestershire
Re: Matt's 1970 'Trans-Am' Cuda
Yep, getting there
Re: Matt's 1970 'Trans-Am' Cuda
Great work and a great thread to follow

-
autofetish
- Posts: 5599
- Joined: Sat May 21, 11 6:43 am
Re: Matt's 1970 'Trans-Am' Cuda
I tried ordering genuine Minilites and they could not give a date when they would be made, so ended up with lookalikes which I am really happy with. I had a deadline of Le Mans and it was 5 years ago so maybe they work differently now, but they did seem to be rather relaxed about when they might make some the right size.
I did need silver not white which is probably easier. You may be lucky and they have them on the shelf!
I did need silver not white which is probably easier. You may be lucky and they have them on the shelf!
Matt Hollingsworth - Vehicle Registrar
Panther Pink 73 Aussie Charger 265 Hemi 4 spd
Challenger Sam Posey Tribute car
Panther Pink 73 Aussie Charger 265 Hemi 4 spd
Challenger Sam Posey Tribute car