
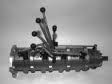
I've bolted the heads on gently using the old gaskets and fitted the rockers.
I have 3 different lengths of pushrod, I've fitted a pair of each to try.
Once I set the lash I need to check how many threads are showing on the adjusters and where the rollers sit on the valve stems.
The roller moves back and forth across the stem tip as the valve opens and closes. If it travels an equal distance each way from the centre line, it's right.
db's 66 Belvedere ***FOR SALE***
Moderator: Moderators
The motor is on hold til I get some cash so it's back to bodywork!
The last repair is on the passenger side lower rear 1/4.
I've cut and tweaked the repair panel, that's virtually ready to go ( I had the same problem with the wheel arch lip as the driver side so tightened up the corners).
This time I've retained the shape so I'm happy to repair the inner 'trunk extension' before I weld the outer into place. I'm doing this in patches to make it easier to retain my lines.
- Attachments
-
- Offside lower quarter. Cutting rust out..jpg (188.4 KiB) Viewed 1161 times
-
- Offside lower quarter. Cutting rust from inner..jpg (190.4 KiB) Viewed 1161 times
-
- Offside lower quarter. Repair patch ready.jpg (168.59 KiB) Viewed 1161 times
No-one will believe you...
Feeling smug- I did some good patch-making and welding today. Apart from rust-killing the remaining original metal the trunk extension is finished.
I now have ONE piece of metal left to weld on
I now have ONE piece of metal left to weld on
- Attachments
-
- Rear quarter. Inner patching done.jpg (243.71 KiB) Viewed 1112 times
-
- Rear quarter. Inner patched.jpg (203.14 KiB) Viewed 1112 times
No-one will believe you...
Hole and patch now trimmed and tweaked.
I'm taking a lot more care with this side to get the edges to line up perfectly so I'm not bridging any gaps with weld. That was a mistake on the driver side which led to a lot more filler! There's no more than 1mm gap right along the mid-panel seam.
Patch edge is joggled, trunk extension flange is punched for 'spot welds' and the whole lot is plastered in zinc.
Hopefully get the welder to it tomorrow
- Attachments
-
- Rear quarter patch timmed, joggled and zinced. Ready to weld..jpg (196.38 KiB) Viewed 1079 times
-
- Rear quarter. Zinced, ready to weld.jpg (174.8 KiB) Viewed 1079 times
No-one will believe you...
Looking great!! Watching your progress closely as Im tackling most of these jobs as well. Im making all the same mistakes if you can call them that. Learning from one side to the other....and with you on the gaps. Much easier to take the time to cut really accurately and keep tolerances to a minimum than bridge gaps etc...great work!! Keep it coming
Cheers Steve
Cheers Steve
Bat Girl Stalker Living Petes Dream
I have this panel stripped clean now, and the seam is leaded and filed.
If my mountain walk is rained off today (which seems VERY likely!) I've hit it with the POR15 now too.
If my mountain walk is rained off today (which seems VERY likely!) I've hit it with the POR15 now too.
- Attachments
-
- Rear quarter. POR 15 done.jpg (218.11 KiB) Viewed 996 times
-
- Rear quarter. Lead filed.jpg (161.96 KiB) Viewed 996 times
-
- Rear quarter. Leaded.jpg (239.07 KiB) Viewed 996 times
No-one will believe you...


-
autofetish
- Posts: 5599
- Joined: Sat May 21, 11 6:43 am
great work DB
and I’m in admiration of your fine collection on curtains, table cloths and bed spreads 

and I’m in admiration of your fine collection on curtains, table cloths and bed spreads
Si
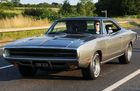
1970 Charger 500
383 | 4bbl | 727 column | PAS | PAB | buckets/buddy - check out my photos HERE
If you don't want another same old brand-new car ... you could be DODGE MATERIAL
1970 Dodge Charger Registry - https://www.1970chargerregistry.com/
1970 Charger 500
383 | 4bbl | 727 column | PAS | PAB | buckets/buddy - check out my photos HERE
If you don't want another same old brand-new car ... you could be DODGE MATERIAL
1970 Dodge Charger Registry - https://www.1970chargerregistry.com/


-
autofetish
- Posts: 5599
- Joined: Sat May 21, 11 6:43 am