db's 66 Belvedere ***FOR SALE***
Moderator: Moderators
-
Steve Chapman
- Posts: 1862
- Joined: Wed Jan 10, 07 4:03 pm
- Location: North Yorkshire
-
Steve Chapman
- Posts: 1862
- Joined: Wed Jan 10, 07 4:03 pm
- Location: North Yorkshire
I've actually found time to do a few bits on the car 
The trunk lid is supported by gas struts. These died due to masking tape on the rams going into the seals so I've had to buy replacements.
I had no idea what they were from or what the springing rate should be so I contacted SGS engineering, who specialise in such things. As I didn't know the rate, I paid a bit extra for adjustables (£50 the pair). These come gassed to a higher pressure than you need and you bleed it off til it's right.
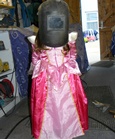
I've fitted the door seals too. These are on the little plastic pegs, but the front end is glued. I used Tiger seal. I've got them held in place with tape til they dry, I'm gonna give em a couple of days to be sure. I didn't half have to slam the doors to get them to close on the new seals! I need to adjust the hinges a bit anyway so I'll sort that problem then.
The trunk lid is supported by gas struts. These died due to masking tape on the rams going into the seals so I've had to buy replacements.
I had no idea what they were from or what the springing rate should be so I contacted SGS engineering, who specialise in such things. As I didn't know the rate, I paid a bit extra for adjustables (£50 the pair). These come gassed to a higher pressure than you need and you bleed it off til it's right.
I've fitted the door seals too. These are on the little plastic pegs, but the front end is glued. I used Tiger seal. I've got them held in place with tape til they dry, I'm gonna give em a couple of days to be sure. I didn't half have to slam the doors to get them to close on the new seals! I need to adjust the hinges a bit anyway so I'll sort that problem then.
- Attachments
-
- seal3.jpg (197.36 KiB) Viewed 1424 times
-
- seal 2.jpg (242.36 KiB) Viewed 1424 times
-
- seal1.jpg (233.48 KiB) Viewed 1424 times
-
- strut.jpg (246.72 KiB) Viewed 1424 times
No-one will believe you...
Great to see the detailed stuff going on. 
Gotta love Tiger Seal. Amazing stuff. The little button for my key fob on the Jeep was Sellotaped on. I tried every glue I had to hold it in , but nothing worked. Tiger Seal sorted it.
Gotta love Tiger Seal. Amazing stuff. The little button for my key fob on the Jeep was Sellotaped on. I tried every glue I had to hold it in , but nothing worked. Tiger Seal sorted it.
It's all about Smiles per gallon !!!
68 Coronet sedan 500 4 door
Dodge Ram SRT 10
MMA-013
68 Coronet sedan 500 4 door
Dodge Ram SRT 10
MMA-013
Had a very productive couple of days
Firstly I adjusted the trunk gas struts. You basically release gas bit by bit until they feel right.
Next job was to tiger seal the trunk seal into place. I held it with masking tape overnight and shut the lid. It's gone a bit wonky from the weight of the trunk lid so I'll have to cut some bits loose and re-stick.
Today Doug came round and taught me the techniques for flatting and buffing. Between us we got the trunk and surround and the roof flatted, most of the runs are sorted. A couple were bad and he broke through so we'll have a bit of touching up to do.
We did buff a bit just to see the end result. Very shiny
Forgot to add pics sorry- You can see in the first one the dimples left as we started sanding out the dust and dirt. It's not that bad a job to flat them out, much easier than I expected!
Once you buff, you see a lot more even tinier dimples that you couldn't see before!
- Attachments
-
- Buffing trunk 01.jpg (233.98 KiB) Viewed 1319 times
-
- Flatting trunk 01.jpg (164 KiB) Viewed 1319 times
Last edited by db on Sat Jan 31, 15 6:38 pm, edited 1 time in total.
No-one will believe you...
Do you have time to run us through the techniques you are using to buff etc please Paul??
Im at that stage with the Fury and have been using 1200, 1500, 2000, the 2500 grit wet and dry with soapy water, then G3 on a wet mop, G10 on a dry mop and carnuba wax on a dry polishing mop to finish....any thoughts and what are you doing / using??
great work by the way...
Cheers Steve
Im at that stage with the Fury and have been using 1200, 1500, 2000, the 2500 grit wet and dry with soapy water, then G3 on a wet mop, G10 on a dry mop and carnuba wax on a dry polishing mop to finish....any thoughts and what are you doing / using??
great work by the way...
Cheers Steve
Bat Girl Stalker Living Petes Dream
Yep, the trick is to know when it is just about to run. If you can stop a nanosecond before that, it will flow amazing... To get a real wet finish from the gun, I add 10-15% reducer.... If that don't run, and there are no noticeable nibs... I am happy to leave it..
I am keeping this Mopar....... SOLD!
Im paranoid about runs. I was told by the guy at the paint shop that my last coats of base and lacquer should be 'wet' ie look shiny but I just know that if I do that outside with a hairdryer to keep things warm, I will get runs. Im just relying on wet sanding and buffing as time isnt a factor. 
Bat Girl Stalker Living Petes Dream